Tuesday, August 30, 2011

Pumpkin Dump Cake

Don't let the name of this dessert scare you off.  I will be the first to admit that it's not all that desirable sounding and what a deception that is because it is probably mine and my family's most favorite thing.  It is called Pumpkin Dump Cake because of the method of creating it.  You literally are dumping one ingredient right on top of the other, making it very simple and quick to assemble.  It truly tastes like an upside down pumpkin pecan pie, but without all of the work.  I should rename it to be called simpler than pumpkin pie.  But, then that takes all the fun out of telling people about my dump cake.

1- 29oz. can of pumpkin
1- 12oz. can of evaporated milk
3 eggs (at room temperature)
3 tsp. of ground cinnamon
1 tsp. of salt
1 cup of sugar
1 box of yellow cake mix
3/4 cup of pecans (chopped)
3/4 cup of real unsalted butter (melted)
cool whip and ground nutmeg for garnish

-Preheat your oven to 350*.  In a large mixing bowl, stir together the pumpkin, evaporated milk, eggs, cinnamon, salt and sugar.  Pour the batter into a 9"x13" baking dish.  Evenly sprinkle the cake mix over the top, toss on the nuts and drizzle it all over with the melted butter.  Bake for 55-65 minutes or until the top of the cake begins to lightly brown.  Allow to cool completely before cutting.  Serve with a dollop of whip cream and a sprinkle of nutmeg on top.  Serves 16.  Enjoy!

Saturday, August 27, 2011

Cucumber Salad


I went to a Polish wedding about ten years ago now I guess.  And at this very authentic Polish Wedding, we were served the most wonderful Cucumber Salad that I have ever had.  And literally since then, I have been trying to recreate it at home, only to repetitively fail at it.  And every year at this time, when I am drowning in fresh garden cucumbers, I attempt another go at it.  I could never get it quite right and that has been driving me absolutely insane for all these years.  I mean, there was only 3 maybe 4 ingredients in the dang dish to begin with.  How on earth could I not figure that out?  So, this year, I decided to get a little bit of input on it to help me figure out what I was missing.  And low and behold, of all things in this entire world that could have been my missing ingredient, it was fresh lemon juice.  How could I have missed that one?  Anyone that is anyone knows that my most favorite thing is lemon.  Go figure.

3-4 large ripe cucumbers (peeled, sliced and then 1/4'd)
16 oz. of sour cream
zest and juice from 1 large lemon
4 T. of fresh dill (chopped)
fresh cracked pepper and sea salt for garnish

-In a large mixing bowl combine the cucumbers, sour cream, lemon zest, lemon juice and dill.  Cover and refrigerate for at least 4 hours (overnight is best).  Serve with a healthy sprinkle of salt and pepper.  Serves 8-10.  Enjoy!

Slow-Cooker BBQ Beef Sandwiches

Boy oh boy.  This is a good one right here.  I absolutely love the addition of the liquid smoke in this BBQ sandwich.  It adds a whole different depth of flavor that can only otherwise be achieved by actually smoking the roast prior to slow-cooking it.  And since I lack a smoking pit, I use this handy little devil.  It has been quite a while since I have used any liquid smoke in my cooking and when I was cleaning out my spice cabinet I spotted it.  And it was as if there was a great white light shining out of it and a symphony booming from somewhere above me.  My first thought was that we shall be using this wonderful extract in some kind of a BBQ masterpiece.  And then my second thought was, that I wanted a beef sandwich.  And viola' there you go.  My Slow-Cooker BBQ Beef Sandwich was born.  It is just that simple for me at times.

3 lb. beef rump roast
1 T. of bacon grease (if I did not have this on hand I would use some e.v.o.-but the bacon grease is the key)
1/4 cup of light brown sugar (packed)
2 T. of Dijon mustard
1 tsp. of liquid smoke
1 1/2 cups of ketchup
1/4 cup of red wine vinegar
2 T. of Worcestershire sauce
1/2 tsp. of salt
1/4 tsp. of black pepper
1/4 tsp. of garlic powder
sliced pickles (see my Jalapeno Dill Pickles recipe)
12 buns

-Heat a stockpot up to a high heat and add in the bacon grease.  Sear each side of the roast for about 3-5 minutes each to form a very dark brown (almost burnt) bark on the exterior.  Meanwhile in a large mixing bowl, combine the remaining ingredients and stir well.  Once the roast is nice and crispy all over, transfer it to your slow-cooker.  Return the stockpot to the stove and reduce the heat to medium-high.  Pour the sauce into the stockpot and bring to a boil while constantly stirring (getting all of the flavor left behind from the bacon grease and the roast).  Then just pour it over the roast in the slow-cooker and set to cook LOW and SLOW for 8-10 hours (the longer the better).  Once it's finished, using two large forks, simply shred up the roast.  Serve on  a split bun with one of my sliced Jalapeno Dill Pickles.  Serves 12.  Enjoy!

Wednesday, August 24, 2011

Garlic-Basil Canned Tomatoes

What better to do with an abundance of fresh ripe garden tomatoes, than to preserve them for later use.  When tomatoes are canned and processed at their ripest point, that is when they are at their best.  Not only is it a great money saver, because like everything else they are much more expensive at the market when out of season.  But, they can be such a great enhancement to your soups, stews and sauces.  I love to use these garlic-basil flavored tomatoes in with my marinara sauces and  in my homemade soups.  And you can do them anyway that suits your cooking best.  You can leave them whole, chopped or diced.  I usually do a batch of both so that I can have them for anything.  There is just something so satisfying about the fact that I bought the seeds, grew the plants, watered and weeded the plants, harvested the crop and preserved them to have throughout the year.  At any given time I can use my preserved fresh organic tomatoes in my cooking, not just during the late summer.  Make the most out of what you have when you have it.  

8 cups of ripe red tomatoes (washed and diced)
12 fresh basil leaves
4 large garlic cloves (peeled and sliced in 1/2)
4 pint-sized mason jars with rims and lids

-Start your large canning stockpot with water to boil (this takes a while) with the lid on.  Once your water is boiling in your canning stockpot, submerge your clean jars, lids and rings into the water and recover with the lid.  Boil for 10 minutes to sterilize them, but remember to start timing it once the water returns to a boil.  Carefully-using special canning tongs only-remove jars (upright), lids and rings and place onto a towel covered cutting board (so you don't damage your counter tops).  Replace the lid back onto the pot to return it back to a boil and maintain that boil.  Go ahead and start filling each of the jars with about 2 cups of tomatoes, 3 basil leaves and 2 cloves of garlic (making sure that everything is below the bottom lip of the jar top (this is the 1/4" of 'headspace' required to be left void at the top of the jar, if you do not do this they will explode-seriously).   Wipe the tops well with a clean damp rag and very tightly fit on the lids with the rings.  Using the canning tongs again, place jars back into the rapidly boiling canning stockpot, along with replacing the lid, to process for 35 minutes.  Remove the jars with the canning tongs and place UPSIDE DOWN back onto your towel lined cutting board.  Allow jars to cool for about an hour or so, then flip them over to stand upright.  Either your lids should already have 'popped' to seal or they will do so when they are flipped at this point.  If any of your lids are not popped inward, then somewhere there was a mistake made.  These un-popped jars are just fine to eat, but must be refrigerated immediately and eaten within 3 weeks.  Otherwise, properly sealed jars may be kept in a cool, dry, dark place like a cabinet or pantry for up to 1 year.  Once opened, again they must be refrigerated and eaten within 3 weeks.  Makes 4 pint jars.  Enjoy!

Tuesday, August 23, 2011

Jalapeno Dill Pickles

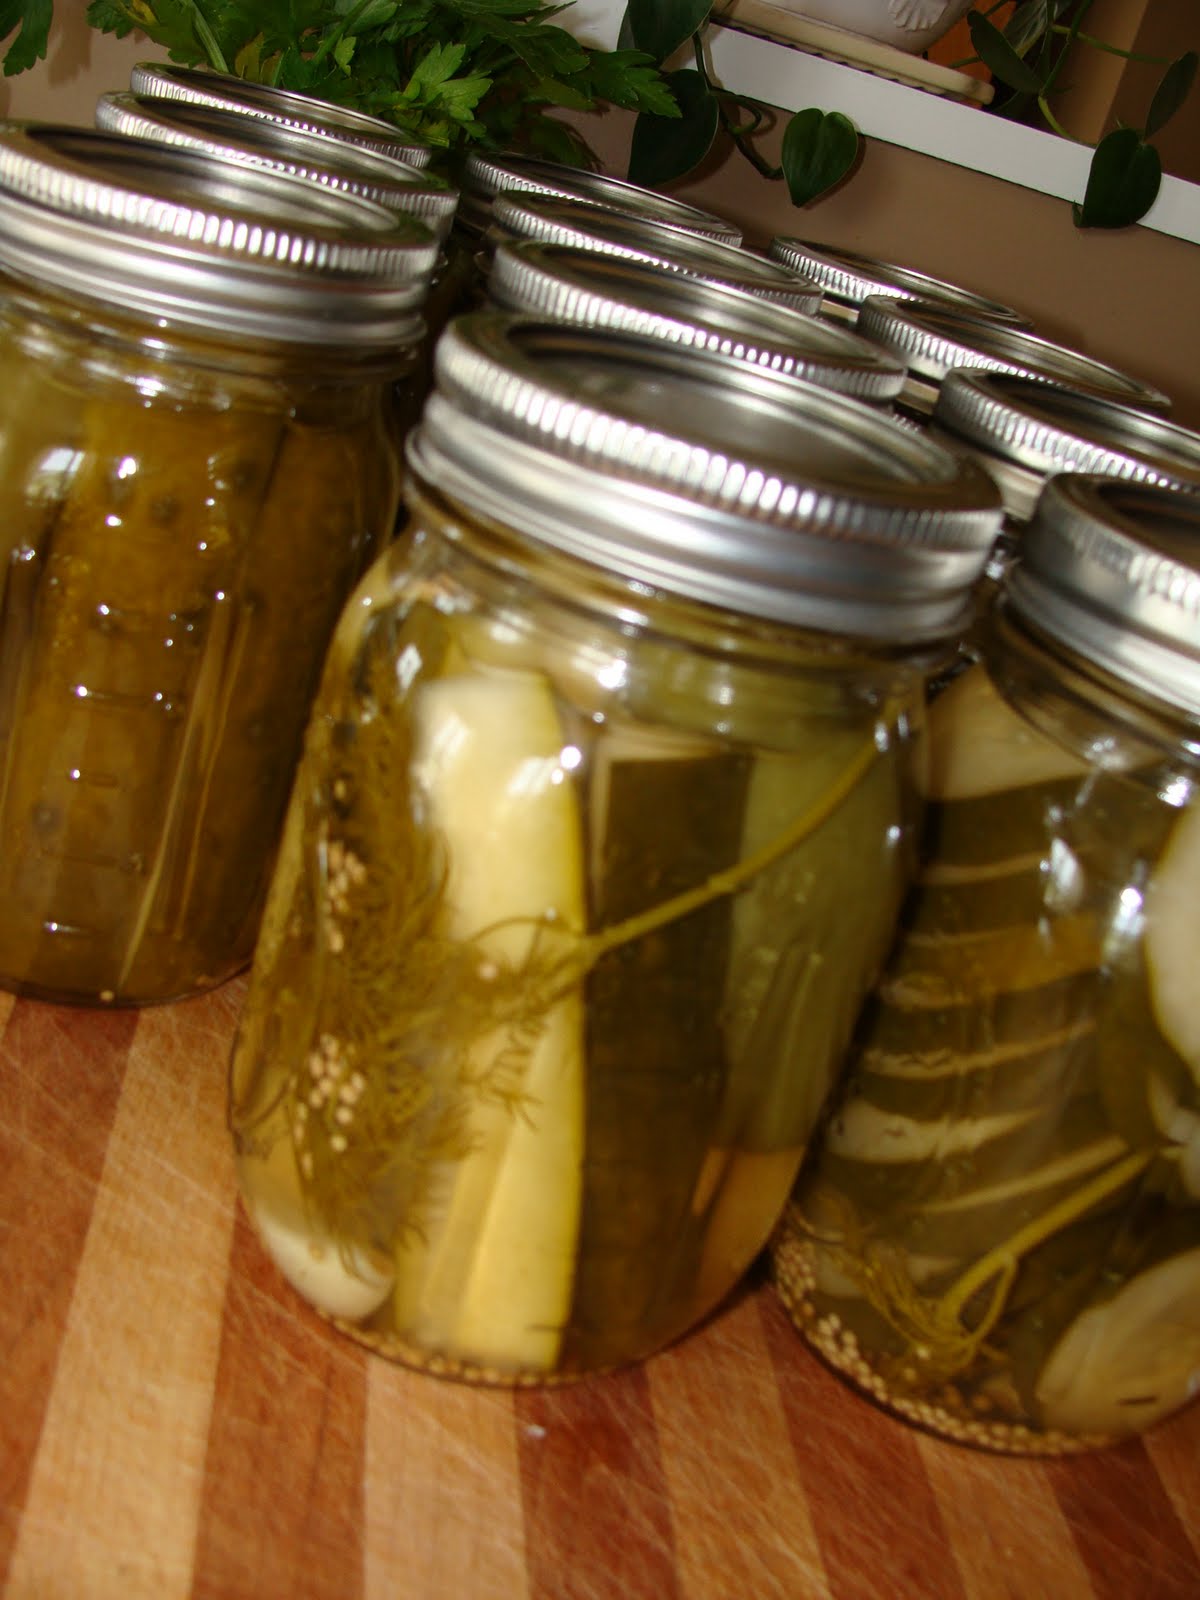
Don't be afraid by canning!  Seriously, pickling is so easy and fun.  It is self-rewarding too.  Not only are you saving money hand over fist by making your own, but you are also getting it the way you want it because you make it the way you like it.  I have never ever ever seen a jar of Jalapeno Dill Pickles on the shelf at any market-and I go to different one's all the time (variety is the spice of life).  Not only that, but I am sure I wouldn't find them with the pickled garlic, whole jalapeno pepper and mustard seeds still in the jar.  And I think those are one of the best parts.  I like to take that jalapeno and slice it up to use it on our tacos, or burritos.  Or enchiladas, or fajitas, or .......  I think you get the point.  Fresh and cheap is the motto for today's world. 

6 lbs. of fresh crisp cucumbers (try to choose similar sized one's)
7 1/2 cups of water
7 1/2 cups of apple cider vinegar
1/2 cup of pickling salt
24 heads of fresh dill -or- 12 T. of dried dill weed
6 tsp. of mustard seeds
12 whole jalapenos (stems and all)
12 garlic cloves (peeled and cracked open a little)

-Wash jars, lids and rings in hot soapy water and rinse well (12 of each).  Get a large canning stock pot going set to boil with your clean jars in it; once boiling, boil jars for 10 minutes.  Meanwhile,  for your brine, bring the water, vinegar and salt to a boil in a large stockpot (if you don't have one large enough, do this recipe in 2 batches by splitting the ingredients in 1/2-I have to).  DO NOT USE A METAL SPOON TO STIR THE BRINE-use a wooden one.  While the brine is heating to a boil, you can get the cucumbers started.  Cut about 1/2" or so off each end, these ends are called the blossom ends.  Keep in mind that you want the pickles to be only as tall as the bottom of the rim on the mason jar.  So, with that in mind, go ahead and start cutting them into spears or in thin slices for chips.  Remove your jars once they have processed for 10 minutes in the boiling water and place on towels.  Start filling them one at a time with 2 sprigs of dill heads -or- 1 T. of dried dill weed, 1 jalapeno, 1 garlic clove, 1/2 tsp. of mustard seeds and enough pickles to keep it loosely packed (the brine needs to get in b/t them).  Remember to leave the 1/2" of head space (distance b/t substance and top rim) by keeping everything to the height of the bottom rim.  Now, your brine should be boiling and combined, go ahead and ladle it into each jar-again keeping it below the bottom rim for that 1/2" of head space allowance (if you fill them too high-they can burst during the process!).  Lid and ring them tightly; wipe off any drips and transfer them back to your boiling canning stockpot, upright, to process again for 10 minutes.  Processing time begins once the water returns back to a boil.  Remove and place upside down on a towel lined counter to cool.  The lids will "pop"  or dimple-in while they cool.  Once cooled, flip them back upright.  Test each lid by pressing in the center, if it dimples-in then they are not correctly processed and must be refrigerated and eaten within 2-3 weeks.  If the lids are hard and solidly in place, then you did it!  They can then be stored in a cool, dark, dry place for up to 1 year.  Once they are opened and the seal has been broken, they are good for 2-3 weeks in the refrigerator.  Technically you should put them in the pantry for the first week before you eat them, but mine never make it to the pantry......  Makes 12 pint mason jars.  Enjoy! 

Wednesday, August 17, 2011

Honey Apple Butter

Fall is in the air.  The bounty of it's harvest is now upon us and Iam making sure to take full advantage of it.  I absolutely love this time of year.  I purchased an entire bushel of apples from my farmers market for a whopping $4.  And from there I set off to create new wonderful ways to make it last throughout the year for us.  This Honey Apple Butter is just one of the delicious ways to do so.  Every time you crack open a jar to spread onto your biscuits, you are reminded of fall's splendor.  Of all it's wonderful colors, aromas and tastes. 

15 or so medium green tart cooking apples (cored and sliced)
3 cups of apple cider
2 cups of light brown sugar (packed)
1 1/2 tsp. of ground cinnamon
1/2 tsp. of ground allspice
4 T. of honey

-In a large stockpot over medium-high heat, bring the apples and the cider to a boil; reduce heat, cover and simmer for 30 minutes (stir often).  Remove pot from stove and place on a cutting board or trivet.  Using a potato masher, mash apples with kind of a grinding motion against the bottom of the pot to break down the remaining skins (you want a pureed kind of texture).  Stir in the brown sugar, cinnamon, allspice and the honey.  Return the pot to the stove and simmer uncovered over low-medium heat for 1 1/2 hours (again stirring often).  It is ready to fill your still hot sterilized jars when it becomes very thick and can mound on a spoon.  Meanwhile, towards the last 30-45 minutes of finishing the apple butter, fill your canning stockpot with the 8- 1/2 pint canning jars, rims and lids along with enough water to cover them.  Place the lid on the stockpot.  Set canning stockpot to boil and once reached, boil to sterilize for 10 minutes.  Once they are finished sterilizing, remove jars, rims and lids with canning tongs to a towel-lined cutting board and fill before cooled.  Replace the lid back onto the canning stockpot to maintain boiling.  Fill each jar up to the bottom ring at the top of the jar, allowing a 1/4" of void space at the top for 'headspace' (or else they will literally explode!).  Wipe rims with a clean damp rag and tightly fit on the lids and rings.  Using canning tongs, carefully place them back into the boiling pot, cover and process for 5 minutes.  Remove jars with canning tongs and place UPSIDE DOWN on your towel-lined cutting board.  Allow to cool for 1 hour or so, then flip upright.  Your tops should have either already popped inward or will do so at this time.  If any of the lids did not seal, they are still good to eat.  They just need to be refrigerated immediately and eaten within 3 weeks.  Properly sealed jars can be stored in a dark, dry, cool place like a cabinet or pantry for up to 1 year.  And again, once they are opened and the seal has been broken, refrigerate and eat within 3 weeks.  Makes 8- 1/2 pint jars.  Enjoy!

Sunday, August 14, 2011

Pickled Jalapeno Green Beans

Why not was my method of thinking when I tumbled this recipe through my mind.  Why not do some fresh green beans canned just like my pickles?  We, and just about everyone who has tried them, already completely love my Jalapeno Dill Pickles.  So, I figured, that since my family absolutely loves green beans prepared in just about anyway, that maybe this might work.  Well, not only did this work, but this worked out to be just awesome.  They are delicious.  They are great alone, added into a salad or just alongside some cole slaw.  These Jalapeno Pickled Green Beans are nothing short of genius.

2 lbs. fresh green beans (with ends snapped off)
6 whole fresh jalapenos
18 fresh garlic cloves (peeled)
3 3/4 cups of water
3 3/4 cups of apple cider vinegar
1/8 cup of pickling salt
6 pint sized canning jars with rings and new lids (washed)

-Start your large canning stockpot with water to boil (this takes a while) with the lid on.  Meanwhile, rinse your beans and jalapenos in a colander with cold water; leave colander to drip dry in sink.  Start a regular stockpot to boil with the water and the vinegar to make your brine.  When that just begins to boil, add in the pickling salt and stir; let boil for a few more minutes.  Once your water is boiling in your canning stockpot, submerge your clean jars, lids and rings into the water and recover with the lid.  Boil for 10 minutes, but remember to start timing it once the water returns to a boil.  Carefully-using special canning tongs only-remove jars (upright), lids and rings and place onto a towel covered cutting board (so you don't damage your counter tops).  Replace the lid back onto the pot to return it back to a boil and maintain that boil.  Pack each jar with a fistful of beans, 1 unpierced whole jalapeno and 3 cloves of garlic (making sure that everything is below the bottom lip of the jar top (this is the 1/4" of 'headspace' required to be left void at the top of the jar, if you do not do this they will explode-seriously).  Fill each packed jar with the brine, again leaving the top 1/4" of the jar void for head space allowance.  Wipe the tops well with a clean damp rag and very tightly fit on the lids with the rings.  Using the canning tongs again, place jars back into the rapidly boiling canning stockpot, along with replacing the lid, to process for 8-10 minutes.  Remove the jars with the canning tongs and place UPSIDE DOWN back onto your towel lined cutting board.  Allow jars to cool for about an hour or so, then flip them over to stand upright.  Either your lids should already have 'popped' to seal or they will do so when they are flipped at this point.  If any of your lids are not popped inward, then somewhere there was a mistake made.  These unpopped jars are just fine to eat, but must be refrigerated immediately and eaten within 3 weeks.  Otherwise, properly sealed jars may be kept in a cool, dry, dark place like a cabinet or pantry for up to 1 year.  Once opened, again they must be refrigerated and eaten within 3 weeks.  Makes 6 pint jars.  Enjoy!

Saturday, August 13, 2011

Garden Harvest Pasta

I just love to whip up dinner out of no where sometimes.  To be able to stand in front of my garden and be able to spy a meal out of its bounty.  It doesn't always have to be fancy or complicated.  And there does not need to be meat in every meal.  Sometimes just the fact that it's fresh and ripe can take a plain basic meal to a whole different level.  When you have just a few fresh ingredients and prepare them in just the right way, you can make it amazing.  Even if all you have is just some veggies and pasta.


3 cups of zucchini (sliced and quartered)
4 T. of extra virgin olive oil
sea salt and fresh cracked pepper
1 medium red onion (quartered and sliced)
3 cloves of garlic (minced)
1- 14 1/2oz. can of chicken stock
2 cups of tomatoes (chopped, I used grape, cherry and Romano just cause that's what I had)
1 lb. of uncooked linguine
1/2 cup of grated Parmesan cheese-

-Start a large stockpot of water to boil.  In a large deep saucepan over medium-high heat, saute' the zucchini in some salt, pepper and the e.v.o. for about 4-5 minutes.  Then add in the onion and the garlic with a pinch more salt and pepper; saute' until all veggies are soft and starting to lightly brown.  Pour in the chicken stock and the tomatoes; let come to a boil.  Reduce heat and simmer.  Meanwhile for the pasta, once the water in the stockpot has reached a roaring boil, stir in 1 T. of e.v.o. and a pinch of salt (this will keep your pasta from sticking and also flavor it).  Add pasta and boil for 7-8 minutes for Au Dente' (keeping in mind that it will continue to cook once added into the sauce and veggies).  Strain the pasta and fold it into the sauce along with the Parmesan cheese.  Serves 4-6.  Enjoy!

Wednesday, August 10, 2011

Slow-Cooker BBQ Pork Chops

I sure do love a good pork chop dinner.  It is good, healthy and cheap.  My favorite combination.  And so far in my kitchen experience, I have found that they are the best when prepared like this.  Pan searing them first adds so much more flavor and some much needed oil.  Then by finishing them off in the slow-cooker, you are basically guaranteeing that they will be "fall off the bone" tender.  I have never had a tough or dry pork chop prepared in this way. 


4-6 bone-in center-cut pork chops
2 T. of extra virgin olive oil
McCormick's Grill Mates Montreal Steak Seasoning
2 cups of BBQ sauce (I used Kraft Original)

-Generously sprinkle both sides of pork chops with the steak seasoning.  In a large saucepan over medium-high heat, sear both side of the pork chops in the e.v.o. (you want a nice dark brown crusting).  Transfer the pork chops to the slow-cooker, which should be set on Low (Low and Slow is the best method for crockery cooking).  Pour BBQ sauce into your saucepan and bring sauce to a boil (this will pick up all of the flavoring left in the pan from the chops).  Add into the slow-cooker, making sure to kind of lift the chops so the sauce gets underneath them as well.  Cover and cook on Low for 8-10 hours (as always, the longer the better).  Serves 4-6.  Enjoy!

Tuesday, August 9, 2011

Peanut Butter Granola

How can you make homemade granola any better than it is on it's own?  I can tell you.  Add peanut butter.  I went to make a batch and realized that I was out of nuts.  I actually did not have a bag of any kind and that's most likely a first for me.  So, improvisation came into play and I settled on subbing in some crunchy peanut butter in place of them.  I even played around with the oats, since I bought the wrong kind, and found that the quick cooking oatmeal is just as good.  If anything it may even be better for this particular recipe than the old fashioned oatmeal that I usually use for my standard granola recipe.  It is a finer texture, so the addition of the peanut butter really helps to give it a nice coating making it better for baking with and for cereal.    

4 1/2 cups of quick cooking oats
1/2 cup of shredded coconut
1/2 cup of broken pretzel sticks
1/2 cup of dried cherries
1/2 cup of raisins
1/2 tsp. of cinnamon
pinch of salt
1/3 cup of canola oil
1/4 cup of honey
2 T. of maple syrup
1/2 cup of light brown sugar
3 T. of crunchy peanut butter
1/2 tsp. of real vanilla extract

-Preheat oven to 325*. In a large mixing bowl stir together the oats, coconut, pretzels, cherries, raisins, cinnamon and salt; set to the side. In a small saucepan bring the oil, honey, syrup and brown sugar to a boil; add in the peanut butter.  Remove from heat and stir in the vanilla extract. Pour into the oat mixture and thoroughly combine. Cover two large cookie sheets with aluminum foil and spray with canola cooking spray. Spread out wet granola evenly on each sheet. Bake for about 25 minutes; stopping every 10 minutes to stir it. Once it has reached a dark golden color, remove from oven and allow to completely cool. Once cooled, break apart into small chunks. Eat alone, top off your yogurt or even garnish the top of some muffins prior to baking. Yields 8-9 cups. Enjoy!

Sunday, August 7, 2011

Fresh Garden Spaghetti

A whole dish can be brought out of just one perfectly ripened vegetable.  Take the zucchini for example.  At this point in summer I will have anywhere from 1 to 3 of them at any given time on my kitchen counter.  Just waiting to inspire a delicious meal or a wonderful dessert.  So when my five year old daughter, Paige, came to me and asked for "sip-up noodles" (spaghetti) for dinner that night.  I immediately thought, yes as I looked over to the beautiful zucchini harvest adorning my counter top.  I then turned to her smiling and said, "Sure sugar, we can have spaghetti tonight.  Thanks for the inspiration Paigey."  Sometimes inspiration can come from anywhere or from anyone.

3-4 cups of zucchini (sliced and 1/4'd)
1 red onion (chopped)
2 cloves of garlic (minced)
2 T. extra virgin olive oil
sea salt and fresh cracked pepper
1- 26oz. jar of spaghetti sauce (I used Traditional Prego)
1 T. of fresh basil (chopped)
1 T. of fresh flat leaf parsley (chopped)
1 lb. of uncooked spaghetti pasta

-In a large saucepan over medium-high heat, saute the zucchini, onion and garlic in some e.v.o. with a good amount of salt and pepper.  Once the veggies are tender and lightly browned all over, add in the red sauce and bring to a boil.  Reduce heat to simmer and add in fresh herbs.  Meanwhile for pasta, bring a large stock pot of water to a roaring boil, add in about a tablespoon of e.v.o. and a nice sprinkle of salt (to flavor and keep your pasta from sticking together), stir and then add in pasta.  Cook for about 7-8 minutes for Au Dente' (keep in mind that it will continue to cook in the hot sauce).  Serve sauce over pasta.  Serves 4-6.  Enjoy!

Thursday, August 4, 2011

Homemade Rice Pudding

This is another one of my favorite childhood desserts.  My Mom used to make us Rice Pudding in the winter time when I was very little.  Even now when I have it baking away in the oven, I can still remember her making it for us.  It is the perfect comfort dessert if you ask me.  I love the heavy creaminess of the pudding with the warmth and spice of the cinnamon.  And for me, all I need is some whip cream on top and a little bit more cinnamon and sugar.  That is comfort at it's finest for me.

3 cups of whole milk
1/2 cup of raw Jasmine Rice (it's all I use)
1/2 tsp. of salt
2/3 cup of sugar
1 cup or more of raisins
1 1/2 tsp. of real vanilla extract
sprinkling of cinnamon and sugar

-Preheat your oven to 300*.  Grease the bottom and sides of a  1 1/2 qt. casserole dish with butter.  Toss in the milk, rice, salt, sugar, raisins and vanilla.  Give it a good stir, then give a good healthy sprinkling of cinnamon and sugar on top.  Bake for about 2 hours or until the top is a nice golden brown.  Serve warm or cold with whip cream or vanilla bean ice cream.  Serves 8.  Enjoy!

Coconut Texas Sheet Cake

This particular recipe was the result of having a hankering for something with coconut in it.  I had an extra can of coconut milk leftover after making homemade Pina Colada's from the night before.  And either I was gonna start cocktail hour a little early that day, or else I needed to figure out a way to bake with it.  And what a wonderful enhancement the coconut milk added to this already fantastic Texas Sheet Cake.  It was the perfect compliment that evening with another batch of Pina Colada's.  What's a girl to do?  I was raised to never waste anything.  And I did only use 6 tablespoons of it in the cake.  

For Cake:
1 cup of water
4 T. of cocoa powder (I use Nestle's, it's cheaper than Hershey's)
1 cup of real unsalted butter
2 cups of all-purpose flour
2 cups of sugar
1/2 tsp. of salt
2 eggs (beaten)
1/2 cup of sour cream
1 tsp. of baking soda

For Frosting:
1/2 cup of real unsalted butter
4 T. of cocoa powder
6 T. of coconut milk (not cream of coconut-it's too thick)
1 lb. of powdered sugar
3/4 cup of shredded coconut for garnish

-Preheat your oven to 375*.  Grease an 11"x13" jelly roll pan (cookie sheet) and set aside.  In a large mixing bowl, combine the flour, sugar and salt.  In a small saucepan over high heat, bring the water, cocoa and butter to a rapid boil; remove from heat and stir into the flour mixture.  Beat in the eggs, sour cream and the baking soda.  Pour into the greased jelly roll pan and bake for 20 minutes.  Meanwhile for the frosting, in a small saucepan over high heat, bring the butter, cocoa and coconut milk to a boil.  Remove from heat and pour into a medium mixing bowl.  Stir in the powdered sugar.  Once the cake is right out from the oven, spread with the frosting and sprinkle the shredded coconut on top.  Let cool completely before slicing.  Store covered at room temperature.  Serves 20.  Enjoy!

Cinnamon-Bun Zucchini Bread

Here is yet another way to incorporate zucchini in with your baking.  It really is one of my most favorite vegetables because of it's versatility.  Zucchini has very little taste by itself, but once you add it into something else it can just take on whatever other flavors its with.  And usually, by the end of my zucchini plants short lives, I have those last couple left on the counter.  You know how it is when you have exhausted yourself on eating something and you get to the point where you could "almost" let them go to waste.  Well, that's when I whip a couple loaves of this and hand them out to my family and friends.  Why let something so good, so easy and so good for you go to waste?

For Bread:
3 cups of all-purpose flour
1 tsp. of cinnamon
1 tsp. of baking soda
1 tsp. of salt
1/2 tsp. of baking powder
1/2 tsp. of ground nutmeg
2 eggs (beaten)
2 cups of sugar
2 cups (1 large) zucchini (grated)
1/2 cup of canola oil

For Cinnamon-Bun Crust:
1/3 cup of real unsalted butter
1 tsp. of cinnamon
1/2 cup of brown sugar (packed)
1/4 tsp. of real vanilla extract

-Preheat your oven to 350*.  Grease the bottoms and 1/2 way up the sides of 2 loaf pans.  In a large mixing bowl, combine the flour, cinnamon, baking soda, salt, baking powder and nutmeg; create a well in the center (a big hole all the way down to the center of the bowl) and set aside.  In another large mixing bowl, stir together the eggs, sugar, zucchini and oil.  Pour this all at once into the well of the flour mixture; mix well and quickly just until combined.  Pour 1/2 of the batter into each of the greased loaf pans; set aside.  For the crusting, in a small saucepan over medium-high heat, melt the butter.  Add in the cinnamon and the brown sugar and bring to a boil while stirring continuously.  Remove from heat and stir in the vanilla.  Pour 1/2 of this mixture over the top of each of the zucchini bread batters.  Using the end of a spoon (I used a chop stick), swirl the batter around the top and into the batter some (this will help combine them so it doesn't just fall off the top when you're eating it).  Bake for 50 minutes or until an inserted wooden toothpick comes out clean.  Let cool on the stove top for about 10-20 minutes, then flip out over saran wrap and wrap each loaf with 2 layers.  If you can, let it sit over night before slicing and serving.  If you can't wait, slice it up, but remember to quickly wrap up the remainder still to lock in the moisture.  Serves 8.  Enjoy!

Blue Cheese Burger on a Pretzel Bun

This is my kind of a burger.  So big and juicy that eating it properly is a waste of time.  This is not for the "Nancy's" out there that don't want to get a little dirty during dinner. This is a burger that you have to dive right into and get a little messy.  And boy is it ever worth it.  The pretzel bun is a perfect compliment to the big thick patty.  It holds up well and has a great sweet and chewy texture to it.  And the sliced blue cheese was most likely invented for a burger.  It is so much easier to use than the crumbled blue cheese, which is just as tasty, but very difficult to keep from falling down inside your grill and burning (it is actually flammable at times!-Yikes!).  Matched perfectly along with the sweet caramelized onions and ketchup and the tart and tangy pickle and mustard.  It is my very own Ying and Yang. 

2 lbs. 80/20 ground beef
4 tsp. of McCormick's Grill Mates Montreal Steak Seasoning
extra virgin olive oil
1 large yellow onion (sliced)
sea salt and fresh cracked pepper
8 slices of blue cheese (you can find this at your grocer's deli counter)
sliced jalapeno dill pickles (see my Jalapeno Dill Pickles recipe)
ketchup
mustard
pretzel hamburger buns

-Preheat grill to a medium-high heat. Place ground beef and steak seasoning in a medium sized mixing bowl and knead well to thoroughly combine. Separate into 4- 1/2 lb. patties. Toss them onto the top rack of the grill for about 5 minutes on each side (for a Medium-Rare. By the time you eat it, it will continue to internally cook to a Medium temperature). Once the burger's is almost done on the second side, place 2 slice's of blue cheese on each burger and close the grill for about 2-3 minutes longer to melt the cheese.  Meanwhile, in a medium skillet over medium heat, saute' the onion in the e.v.o. with some salt and pepper.  You want them to caramelize, so this could take about 20-30 minutes (make sure you allow time for this part-it is what makes it though).  Assemble burger's on a pretzel bun and top with caramelized onions, a pickle, ketchup and some mustard.  Serves 4.  Enjoy!

Tuesday, August 2, 2011

Shrimp Alfredo

This is one of many peoples favorite way to have Fettucini Alfredo.  The shrimp instantly take it to another level.  Making it a dish of desire for most.  And I am shocked at how many people will order this out at a restaurant at twice the price as making it at home for their whole family.  It really is extremely quick, easy and affordable to make.  By the time the pasta is ready, so is the sauce.  So simple and so good.

1 lb. of large deveined frozen shrimp (20-30 count bag)
2 T. of real unsalted butter
sea salt and fresh cracked pepper
1 lb. of uncooked fettucini pasta
1 T. extra virgin olive oil
1 pint of heavy whipping cream
1 cup of parmesan cheese (grated)
1-2 T. of fresh basil (chopped)
fresh parsley for garnish (chopped)

-Place your frozen shrimp in a colander in your sink.  Let cold water run over it to defrost, takes only a few minutes.  Once the shrimp is defrosted, you can easily peel and take the tails off.  In a large sauce pan over medium-high heat, saute' the shrimp in the butter, salt and pepper for about 3 minutes.  Meanwhile get your water going to boil in a large stock pot for your pasta.  Once it reaches a boil, lightly salt it and add in a little bit of e.v.o. to flavor your pasta and keep it from sticking together.  Back to the shrimp, once it is finished sauting remove them and set aside, add in the heavy cream and grated parmesan cheese ito the sauce pan.  Let this get to a good boil, then reduce the heat and simmer on low until it thickens up a little bit (keep in mind to be stirring it the entire time). Once your sauce has slightly thickened and your pasta is ready, fold the basil, shrimp and the pasta into it.  Garnish with fresh chopped parsley.  Serves 4-6.  Enjoy!