Sunday, January 29, 2012

My Fried Potatoes

Finally, finally, finally.  After cooking for my husband for over seven years now, he finally gave me an actual response when I asked him what he wants for dinner.  Well, at least for what he wanted for a side.  But, beggars can't be choosers and I will take what I can get from him.  And if my baby wants some fried potatoes, then my baby's gonna get some fried potatoes.  Especially when I realized that I had yet to write them up and photo them ;)

1 large T. of bacon grease
4 medium-sized Yukon gold potatoes (washed, rinsed, quartered and sliced)
4 medium-sized New red potatoes (washed, rinsed, quartered and sliced)
lots and lots of fresh cracked pepper and a good amount of sea salt
1 medium onion (chopped)
dried parsley for garnish

-  Heat up your bacon grease in a large deep saucepan, over medium heat, and toss in your potatoes, pepper and salt.  Stir every body up well and cover the pan.  Make sure to open up the lid and give them a good stir every 3-4 minutes (so that you can develop a good crust on them, but not burn them) and cook them for about 15 minutes, then add in a smidgen more of bacon grease and your onions.  Cover the pan back up and continue to cook and occasionally stir it up for about 5-10 minutes minutes more.  Garnish them with a sprinkle of parsley and a dollop of sour cream.  Serves 4-6.  Enjoy!

Slow-Cooker Creamed Corn

I owe the inspiration for this one to my oldest and very best friend, my cousin Nikki.  She called a few days before Thanksgiving this year, we are faithful daily coffee chatters in the morning on the phone, to tell me about her amazing pre-Thanksgiving dinner, only to rant and rave about one particular dish.  A corn dish made with cream cheese she said.  See, she had gone to her boyfriends parents home for her first Thanksgiving dinner with his family, and so she got to experience their traditional holiday feast for the first time.  And boy, you never would have known that there was anything else served besides this corn side that she was going on and on about.  Because that was all she talked about.  I automatically assumed that she was talking about the corn bread casserole that our family, including myself, notoriously are known for on our holiday spreads.  And she was like oh no no no, Tonya.  This one was different.  It was done in a crock pot and it was creamy.  And by the time she was explaining that she would contact his Mother to get the recipe for me, I had already googled up about 20 different versions.  Because, of course, she had me at cream cheese.

2- 16oz. bags of frozen yellow sweet corn
1/2 cup of real un-salted butter
1- 8oz. brick of cream cheese (I only use Philadelphia)
1/2 cup of heavy whipping cream
1/4 tsp. of ground white pepper
2-3 tsp. of sugar
a healthy amount of sea salt

-Toss the corn into your slow-cooker.  Using a medium-sized saucepan, over a low-medium heat, melt the butter and the cream cheese.  Whisk in the heavy cream, white pepper, salt and sugar.  Once it is thick and smooth, remove from the flame and pour into your slow-cooker with the frozen corn; stir well.  Set to go on HI for 1 hour, then reduce to LOW for 4 hours or so more.  Serves 8.  Enjoy!

Thursday, January 26, 2012

Ranch Sirloin

These are the kind of dinners that I love to make.  Preferably in warmer weather, but regardless even if is the dead of winter.  This dish is a nice fast paced quick process that yields a wonderfully pleasing end result.  As long as it is prepared in the proper order, you can guarantee that you will not only have a delicious meal, but one that is even more so because it is all properly cooked.  Nothing says nothing like a well cooked steak and a creamy baked potato off the grill.  Pure grilling bliss is what it is.

8 baby Yukon potatoes
1 carton of whole mushrooms (washed, rinsed and quartered)
1-2 T. of real butter (diced)
McCormick's Grill Mates Montreal Steak Seasoning
4 beef sirloin steaks
1/4 cup of ranch dressing (I am a Hidden Valley girl)

-Preheat your grill to a medium-high heat.  First start with your potatoes.  Wash, rinse, dry and pierce them well with a fork.  Wrap them in a double layer of aluminum foil and toss them onto the top rack of your grill (they will cook out perfectly while you get everything else ready), remembering to occassionally turn them during the grilling process.  Place your chopped mushrooms in the center of a large square of aluminum foil.  Dot it with butter and sprinkle a nice light layer of the steak seasoning over the top of them.  Then, just fold your sides inward, bringing them to gather together tightly above, creating a closed pouch.  Toss them onto the top rack of your grill.  Now for the steaks, sprinkle both sides of them evenly with the steak seasoning and toss them onto the bottom rack of your grill (I like a little charring on the outside and a red center, so I found that I like to do my steak close to the flame like this).  Go ahead and baste both sides of them with the ranch dressing (yep.  ranch dressing) and grill them for about 4-5 minutes on each side for a Medium center (more or less depending on the thickness of your cut).  Once they are done to your liking so should be your potatoes and your mushrooms.  Serve the steak smothered in mushrooms with some grilled whole potatoes.  Serves 4.  Enjoy!

Tuesday, January 24, 2012

Stuffed Manicotti

Here we go.  Now we are speaking my language.  Fine Italian cuisine.  Pasta stuffed with fresh herbs and packed tightly with multiple cheeses, drenched in a nice bright red sauce and smothered in a nutty blanket of cheese.  There are few things in this world that excites me even close to what this dish does for me.   And that was exactly the reason that I chose this particular dish as our main course this year for our Christmas Dinner.  Alright.  And the fact that is was perfectly color coordinated to fit the occassion as well.  I could not let that one go unnoticed.

12 large uncooked manicotti pasta shells
4 cups of shredded mozzarella cheese (divided)
2 cups of ricotta cheese
1/4 cup or so of fresh basil (chopped)
1 tsp. of fresh lemon juice (just a little bit to brighten it up)
1 T. of extra virgin olive oil
1- 15oz. can of diced tomatoes (drained and mashed)
1 clove of garlic (minced)
1 T. of dried Italian seasonings
1- 29oz. can of tomato sauce
1/2 cup of grated Parmesan cheese
fresh parsley for garnish (chopped)

-Preheat your oven to 350*.  Grease a 9x13" baking dish and set aside.  Prepare your pasta to Al dente as directed on the back of their box.  Once finished, rinse with cold water and lay out on a paper towel-lined counter top to dry (keeps the filling from sliding out while you are trying to stuff them).  Meanwhile, for you filling, mix together 2 cups of the mozzarella cheese, the ricotta, the fresh basil and the lemon juice in a large mixing bowl.  Using a teaspoon (I use an ice tea spoon-it's longer and narrower), stuff the pasta tightly with the filling.  In a medium saucepan over medium-high heat, heat up the e.v.o., once you can smell it, toss in the drained and mashed diced tomatoes, garlic and the Italian seasonings.  Simmer them for about 2-3 minutes then pour in the tomato sauce.  Bring this to a good boil then remove from the heat.  Pour half of this into the greased baking dish.  Pile in the stuffed pasta and cover with the remaining red sauce and the last 2 cups of mozzarella cheese.  Bake at 350* for 15 minutes, remove, cover the top with the Parmesan cheese and finish it off back in your oven for about 5-10 minutes more.  Remove from the oven and garnish the top with fresh chopped parsley.  Serves 4-6.  Enjoy!

Monday, January 23, 2012

Yet Another Pumpkin Pie


Sometimes I stumble onto a new recipe without ever intending to or even noticing it right away.  This little dandy here is a direct result of poor planning.  I made a special trip to the market this morning to grab some pumpkin to feed my pumpkin craving.  I have been experiencing symptoms of withdrawal for over a week now.  I just can't get it off my mind.  And, I intended to just grab a small can to make some of my delicious Pumpkin Pancakes for dinner this week.  Well, I stood there with that little can in my hand, just starring at the big can that was next to it on the shelf.  And I asked myself, yes I talk to myself out loud, "Are the pancakes gonna be enough on their own?"  And then I answered myself right back, yes out loud again, "Nope, but a pie too will do the trick."  So I skipped my way home and started getting it all together.  I made my Tonya's Special Pie Crust, rolled it out, placed it in the pie dish and began grabbing my ingredients for the inside.  And that's when I realized that I did not have evaporated milk.  I had already opened the can of pumpkin and there was absolutely no turning back for me.  So, I considered condensed milk and no sugar.  Nope I thought, can't remember if that one was out loud or not, but 5 to none it probably was, I have done that before.  And the longer that I have been cooking, the less and less I like to use old tricks on new games.  So, I used some milk and changed around my spices.  And here you have it, yet another pumpkin pie from Tonya.

1- 15oz. can of pumpkin
2 eggs (that have stood at room temperature for about 20 minutes and are beaten well)
1 cup of milk (I used 2%)
3/4 cup of sugar
1/2 tsp. of salt
1 tsp. of ground cinnamon
1/4 tsp. of ground nutmeg
1/2 tsp. of ground ginger
milk and a pinch of sugar for brushing on the crust to garnish
1 pie shell from my Tonya's Special Pie Crust recipe:  http://tonya-justcooking.blogspot.com/2010/11/tonyas-special-pie-crust.html

-Preheat your oven to 375*.  In a large mixing bowl, stir together the pumpkin, eggs and milk; set aside.  In a small mixing bowl, combine the sugar, salt, cinnamon, nutmeg and ginger.  Add this to the pumpkin mixture and stir well.  Pour this into your unbaked 9" pie crust.  Once you have shaped your edge to your liking (I re-rolled my dough trimmings and just used a cookie cutter that I found in my kids play kitchen to make little heart shaped cut outs to finish off my edges-just slightly press them into the crust to make sure they stick after being baked), brush the edges with milk and sprinkle well with some sugar.  Cut a medium-sized circle out of a large square of aluminum foil and place it over the pie (you want the inside of the pie exposed, but the edges covered).  Bake at 375* for 50 minutes, remove the foil cover and continue to bake for no more than 5 minutes or so more.  Remove from oven and let stand to cool, then refrigerate for at least an hour before slicing.  Serve with a dollop of cool whip and a sprinkle of pumpkin pie spice.  Serves 8.  Enjoy!

Saturday, January 21, 2012

Creamy Macaroni and Cheese

Whenever anyone ever talks about homemade mac and cheese, they always emphasize on the top of the casserole.  They love the crunch.  But me?  No I am not about the crunch at all.  I am all about the soft ooey gooey creaminess that is found underneath that crust that they all love so much.  That left me to ponder why I even make my homemade mac and cheese with a crumbly crust, as I do in my Baked Macaroni and Cheese recipe.   So, I figured that since I have already satisfied the masses with that traditional recipe, that it was time to concoct one for myself.  One that is solely based on the rich velvety goodness of cheese and pasta. 


pinch of salt + 1 T. of extra virgin olive oil (for pasta water)
1/2 cup + 1 T. of unsalted butter
2 chicken flavored bouillon cubes
1 brick of cream cheese
1/4 cup of cold tap water + 2 T. of cornstarch (this is your thickening agent, a cornstarch slurry)
a good amount of sea salt
2 dashes of white pepper
3 finger pinches of light brown sugar
2 dashes of ground nutmeg
1 cup of shredded mild cheddar and Monterrey jack cheese
2 cups of shredded sharp cheddar
1 cup of heavy whipping cream

-Preheat your oven to 350*.  Using some real butter, grease the bottom and sides of a large casserole dish; set aside.  Start a medium sauce pan of water for a boil for your pasta.  Once it reaches a rapid bowl, stir in a pinch of sea salt and about 1 T. of e.v.o. and then your uncooked pasta.  Boil for 5-6 minutes for Al dente; strain and set aside.  Meanwhile for your cheese sauce, melt your butter, bouillon cubes and cream cheese in a large stockpot (it makes it easier when you are folding in your pasta if you are in a deep pot) over medium heat.  In a small measuring cup, using a fork, stir together your water and cornstarch to make a slurry; pour into butter mixture.  Stir in the salt, white pepper, brown sugar, nutmeg and shredded cheeses.  Once these are pretty much melted down, add in the heavy cream and increase your heat a bit.  Keep stirring this as it is heating up, and it will begin to thicken and take on a heavy, smooth, velvety texture.  Then just fold in your strained Al dente pasta and combine well.  Transfer into your butter greased casserole dish, cover and bake at 350* for about 30 minutes or until hot and bubbly.  Serves 6-8.  Enjoy!

Wednesday, January 18, 2012

Pecan Glazed Broiled Salmon

Talk about one amazing way to have some salmon.  This combination of flavors is truly a match made in heaven.  I personally think that salmon has it's own sweetness quality to it and that it pairs up perfectly with any type of fruit or nuts.  And pecans happen to be the one thing that I think goes the best with it.  So, with that being said, I now have to give thanks to one of my readers, Catherine, fore she is the one who turned me onto this great glaze when she mailed it to my home for me to try.  She was right, it is absolutely delicious.

4 nice sized salmon filet's (cleaned and skinned completely)
1-2 T. of extra virgin olive oil (divided)
sea salt and fresh cracked pepper
1/3 cup of a store-bought pecan glaze (I used Dr. Pete's Praline Mustard Glaze)
1 recipe of my Rustic Mashed Potatoes

-Place your oven rack in the center position and preheat it to a HI broil.  Cover a medium-sized cookie sheet with aluminum foil (making sure to wrap it up and around the edges so you don't bake the oil onto your pan and discolor it) and pour about 2 tsp. or so of the olive oil in the center of it.  Using a wadded up paper towel, working in circular motion, spread the e.v.o. out to completely cover the surface nice and lightly.  Lay your salmon out on the greased pan now.  Drizzle the tops of the salmon with the remaining e.v.o. (only using as much as you need to depending on the size of the filet's) and brush it over them making sure to hit all the edges, nooks and crannies.  Give the tops of them a nice healthy sprinkling of the salt and pepper and place the pan on the center rack in the broiler.  Broil on HI for 8-10 minutes watching carefully towards the end.  As soon as the edges are just beginning to turn a light golden brown, remove the pan.  Spoon the pecan glaze over the tops of each of the filet's and place back into your broiler on high for only 30-45 seconds (it will burn right away if you go over 1 minute!) or just until it starts to boil up on top.  Serve with some of my Rustic Mashed Potatoes and steamed vegetables.  Serves 4.  Enjoy! 

Sunday, January 15, 2012

Chocolate Biscotti

I have always seen and heard of biscotti before on cooking shows and in food magazines, but never have I made it or actually ever even tried it.  I never really knew exactly what it was.  So, I decided to find out what all the hype was really about.  Then I realized from reading up about it in one of my cook books, that all it really is is a twice baked cookie.  And truth be told, I have never met a cookie that I did not like.  So, I decided to give it a whirl.  And boy oh boy am I, and everybody else here at home, so glad that I did.  They are utterly delicious with a nice hot cup of fresh coffee or even with a glass of icy cold milk.  I will take two cookie's please, served up either way. 

1/2 cup of real un-salted butter
1 tsp. of real vanilla extract
2/3 cup of sugar
1/4 cup of unsweetened cocoa powder
2 tsp. of baking powder
dash of salt
2 eggs (that have sat at room temperature x 20 minutes or so)
1 3/4 cups of all-purpose flour
3/4 cup of semi-sweet chocolate chips

-Preheat your oven to 375*.  Grease a large cookie sheet (I use a baking stone); set aside.  Beat together the butter, vanilla extract and the sugar until fluffy.  Beat in the cocoa powder (carefully or else you'll be wearing it!), baking powder and the salt well.  Beat in the eggs, one at a time, until just blended.  Beat in the flour in small increments (about a 1/2 cup at a time), making sure to thoroughly combine them before each next addition.  Using a sturdy wooden spoon, stir in the chocolate chips.  Divide the cookie dough into two equal parts and place onto your large greased cookie sheet.  Create 2 'logs' of dough each one about 10" long and have them run lengthwise on the cookie sheet.   Using the flattened palm of your hand, press them down so that they are about 2" wide (making sure there is about 3" or so at least between the 2 logs).  Bake at 375* for 20 minutes or until an inserted wooden toothpick comes out clean.  Remove from oven and allow them to cool on the cookie sheet for 1 hour.  Preheat your oven to 325*.  Then place the logs onto a cutting board and using a bread knife (or any long serrated knife) and slice them horizontally with a slight horizontal angle to them (about 1/2" thick).  Lay them out cut-side down, without touching each other right back on your cookie sheet.  Bake them off for the second time for at 325* for 7-8 minutes, flip them very carefully with your finger tips and finish baking for 7-8 minutes more.  Place them on a wire rack to cool completely (so that the heat from them does not become trapped underneath them like on a wax paper-lined counter top, causing them to soften).  Serve with coffee or milk.  Makes 20-24 cookies.  Enjoy!

Friday, January 13, 2012

Eggplant Parmigiana

I have to give my credit to my two oldest girls, Kalena and Kiley, for the inspiration of this dish.  With both of them being vegetarians for many many years now, I am left to ponder new ways to bring us together as a family.  And for my mind, that basically means new recipes that all of us would love for dinner and dessert.  Because my cooking is the glue that I use to hold it all together with.  To pull them back here, to sit around one table and share what I can do best with all of them.  My cooking, which is my outlet of my love for them.  They are both much older now, with them being from my husbands first marriage (and he is 10 years my senior) and have busy busy lives of their own with college, high school, work and of course their friends.  And it is true, just as everyone has told me, teenagers want to be with their friends.  At first I was in total denial of this.  I was dead set that it had to be because of me and the new babies that they started to come home to us less and less.  And I was at such a depressed loss on how to handle and change this.  But in time, and with many encouraging smiles and hugs from my Mom, my sole inspiration to be all that is good in this world for myself and my family, I became to understand that they are teenagers, just as I was not so very long ago.  And I did know one thing, they love my cooking.  So, with that being said, I was ready to lure them on home with weekly standing invites for dinner.  And it works.  Of course not every time due to school and work, but most of the time.  My cooking has held us all together for many years already and will be doing it for many years to come.  I love those two girls as my own and I hope, and at times I can almost feel it, that they do me too.

2 T. extra virgin olive oil
1 cup of baby portabella mushrooms (chopped)
1 medium red onion (diced)
1 large garlic clove (minced)
sea salt and fresh cracked pepper
4 T. of red wine (rule of thumb-cook with what you would drink-I used Lambrusco since it's sweet)
1 and a 1/2 jars (26oz. jars) of prepared red sauce (I used Prego Traditional)
1 tsp. of Italian seasonings
4 T. of extra virgin olive oil (divided)
2 nice sized eggplants (peeled and thickly sliced horizontally)
2 eggs
2 T. of water
3/4 cup of Italian seasoned bread crumbs
1/4 cup of grated Parmesan cheese
2 cups of finely shredded mozzarella cheese
1 lb. of uncooked spaghetti pasta

-Preheat your oven to 400*.  Add your e.v.o. into a large deep saucepan over medium-high heat.  Once the pan is good and hot (and you can smell the olive oil), toss in the mushrooms, onions and a healthy sprinkle of salt and pepper.  Saute them until they are softened, then stir in the garlic.  Once you can smell the garlic, pour in the red wine and let this come to a nice little boil.  Pour in the red sauce and the Italian seasonings and return it to a boil again; reduce heat to simmer, covered until ready to use (the longer the better).  Now you are ready to start the eggplant.  Heat up 1 T. of the e.v.o. in a large skillet over a medium-high heat.  In a small shallow bowl, beat together the eggs, water and some salt and pepper (to season the eggplant itself).  Pour your bread crumbs in another small shallow bowl.  One by one, dip the eggplant thoroughly in the egg wash, then dredge it evenly in the bread crumbs and carefully place into your hot oiled pan (I had to do this in batches of 5-6 slices at a time to fit in my pan).  Pan fry them for about 2-4 minutes on each side or just until they are a nice golden brown color.  Transfer them to a paper towel-lined plate to absorb the oil while you do the remaining batches.  Once the eggplant has all been battered and fried, lay them out in a 9x13" baking dish (mine fit snug and perfect), sprinkle the tops heavily in the Parmesan cheese, ladle a good amount of the red sauce over them and then cover the whole dish in a thick blanket of mozzarella cheese.  Bake on the center rack of your oven at 400* for 10 minutes, then toss the oven temp. up to a HI broil x about 2 minutes to just slightly toast up the cheese a bit.  Serve with garlic bread.  Serves 6.  Enjoy!

Saturday, January 7, 2012

Slow-Cooker Italian Sausage and Peppers on a Bun

I love Italian sausage in or with just about anything.  Especially some cheese tortellini and red sauce.  But, truth be told, I think that I just may love it this way the best.  The flavors are all so bright and distinct from the sausage to the peppers and then they are all merried together by this wonderful zippy sauce.  And then to top it off on a really delicious soft warm hoagie roll is next to bliss if you ask me.  Honest to god, it really is a party in your mouth.

1 lb. (about 5) mild Italian sausage links
1/2 cup of water
1 T. of extra virgin olive oil
1 large yellow onion (sliced)
2 medium green sweet peppers (cored and sliced)
1 cup or so of baby portabella mushrooms (sliced)
sea salt and fresh cracked pepper
1 garlic clove (minced)
1/4 cup of Italian salad dressing
2 T. of coarse ground Dijon mustard
5 hoagie buns (splurge on these and get the fresh ones from your markets bakery)

-In a large saucepan, over medium-high heat, brown your sausage well on all sides.  Add in the water, bring to a boil, reduce heat, cover and simmer for about 5 more minutes to cook them throughout the center.  Plate the sausages and set aside; drain pan.  Return the same pan (with all the good stuff still stuck to it-that's flavor) back to your stove top and heat it back up to a medium heat.  Toss in your e.v.o. and once you can smell it, then you are ready to add in the onion, peppers and mushrooms.  Give them a nice healthy sprinkle of salt and pepper and saute them until they are soft;  add in the garlic now.  Once you can smell the garlic, stir in the Italian salad dressing and the Dijon mustard.  Place your sausages back in the pan and bring all of this to a slight boil; reduce the heat.  Either transfer to your slow-cooker set to go Low and slow until dinner or you can serve them at this point (they are so much more tender after being in the slow-cooker for a few hours though).  Serve on a warm toasted hoagie bun.  Serves 4-5.  Enjoy!

Wednesday, January 4, 2012

Slow-Cooker Black Bean Soup

Here is another one of my all-time favorites.  Some black bean soup.  It is warm, hearty and full of rich deep flavor.  I love how it has a nice strong smokiness to it from the ham bone.  You cannot get that from just using the ham alone.  The marrow of the bone has the most intense flavor inside of it, for which the entire soup is based off of.  And cannot be made without.

1 leftover ham bone and scraps (I froze mine from the spiral ham my Mom made for Christmas-defrost it if frozen)
4 cups of water
32oz. of chicken stock
1 medium yellow onion (diced)
1 cup of peeled baby carrots
3 stalks of celery (chopped)
5 cans of black beans (drained and divided)
1/2 tsp. of ground cumin powder
2 T. of cornstarch + 1/4 cup of water (for your thickening agent)
1 small red onion (diced-for garnish)
3 T. of sliced pickled jalapenos (minced-for garnish)
sour cream (for garnish)
salty tortilla chips (for garnish)

-In a large dutch oven or stockpot, bring the first six ingredients together in a boil.  Reduce the heat to low, cover and simmer for about 2 hours.  Using a skimmer or ladle, remove the ham bone and scrap meat and place in a large bowl to cool and then the carrots (that's why we left them whole-to remove easily) to a small bowl.  Place the carrots (and whatever little bit of celery and onion that comes with them) and two cans of the drained black beans into your blender (like me) or your food processor (like I wish I had); puree well.  Then just pour this right back into your pot, add in the remaining two cans of drained black beans, cumin powder and bring it all to a nice boil.  In a small measuring cup, stir together the cornstarch and the 1/4 cup of water (this is a cornstarch 'slurry' that will tighten and thicken up your soup to give it more body), pour it into the boiling soup and stir it in well.  Reduce the heat to a simmer.  Now you can serve it at this time, or if you are like me and prefer to do your cooking early in the day, you can transfer it to your slow-cooker set to go Low and slow all day.  Serve it with a pinch of diced red onion, a sprinkle of minced jalapenos, a dollop of sour cream and a couple of tortilla chips right on top.  Serves 6.  Enjoy!

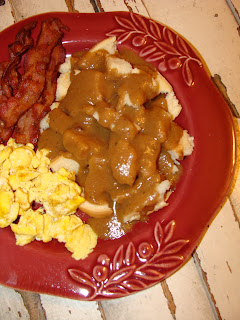
Shit on a Shingle

We have all heard it referenced at one point in time or another.  But, how many of you really truly know what shit on a shingle is?  It is simply water gravy made from meat grease served over toast.  Sounds good right?  Hardly.  But it so very is!  Honest to god it is absolutely delicious.  And with my family being straight up hillbillies from the deep down south, we are all no strangers to this dish.  We have had it made just about any way.  From budding beef to bologna and any other way in between.  But for me, it's all about the bacon.  It's always all about the bacon when it comes to me.  Because, I think that bacon makes everything better.


1 lb. of bacon
9 T. of pancake mix
3-4 cups of water
fresh cracked pepper
8-12 pieces of white bread (toasted)

-In a large sauce pan over medium-high heat, fry your bacon in batches of 4-5 pieces at a time (or however many you can fit in without them overlapping).  Make sure that you are not removing any of the grease, it is necessary to make the gravy.  Once all of the bacon has been fried and placed on a paper towel-lined plate to the side, you can begin to make the gravy.  Reduce the heat down to a low-medium.  Stir the pancake mix right into your still hot bacon grease.  Bring this to a frothy boil (which happens quickly) and add in 3 cups of water.  Stir this well (you may have to take your heat down a notch at this point).  If you prefer your gravy to be thinner, start adding in more water at about 1/3 of a cup at a time to reach the consistency that you are looking for.  Give it a healthy sprinkle of pepper (salt is not necessary since you made this from salty bacon-but you could toss it in if you think it needs more).  Serve this gravy over some freshly toasted white bread alongside some scrambled eggs and bacon.  Serves 4-6.  Enjoy!